Creating Links
When using the WYSIWYG (What You See Is What You Get) editor, you'll notice three chainlink icons. These tools will aid you in creating internal, external, mailto, and anchor links.
Chainlink icon with a plus sign - Creates internal links
This tool will allow you to search the content within your site. All content is searchable, including page nodes, media nodes, and files. You can also use it to add anchor links.
Chainlink icon- Creates external links and email links
This tool does not allow you to search internal content. To create external links, be sure to use the full URL including the http or https. There is an advanced option to open a new window (tab).
Create a Link
To create a link, it is best to type what you want linked. For example, if you want a link that takes you to another page on your site, type the page title. Highlight that page title so that it is selected, then click on the appropriate chain link icon.
Create a Mailto Link
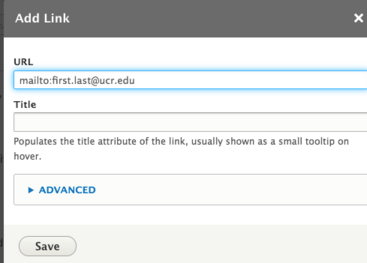
To create an email, or "mailto" link, use the icon without the plus sign.
- Type the email address or person's name you want to have linked
- Click on the chain link icon
- Fill out the URL field with "mailto:" and then the email address.
Create an Anchor Link
An anchor link gives your visitors the option to scroll down to a certain section on the page. There are two parts to an anchor link. 1. The markup where the anchor is positioned and 2. The link visitors will click on to get to that set position.
- First decide where the anchor needs to be positioned. Usually this is right before a heading of a new section of content.
- Switch Rich Text Editor from Limited to Source.
- Click on the "source" button in the WYSIWYG editor
- In source, find where the anchor needs to be placed.
- Add the tag: <a id="anchorname"></a>
Be sure to replace "anchorname" with your specific anchor name. This should be short and have no spaces. You can alternatively use this on a heading, such as <h2 id="anchorname"></a> - Click the source icon to get back into the regular view.
- The second part is to determine how and where you want your visitors to get to that link. You could have a listing at the top of that page, you could have them come in from different pages, or even create an additional menu that is placed on the page for all the anchors. Steps 8-11 will assume a list was created at the top of a page.
- After creating the text at the top of your page that correspond with the various anchored sections, you will link them appropriately to the anchor.
- Highlight the text you want your visitor to click in order to scroll to that particular section on the page.
- Click on the internal chain link icon and find the page that the anchor is on.
- Add "#anchorname" (replace anchorname with your real anchor name) on to the URL. In the example, I have placed the anchor on the /training/links page, so I will add #anchorname to that.
Linking to Documents
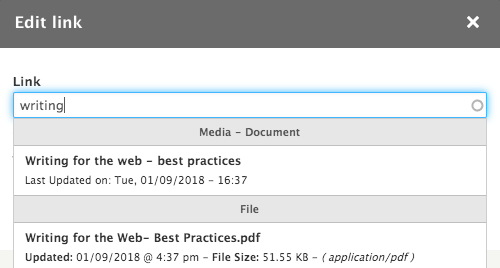
If a document has been uploaded to your Drupal site using "Media", then you can link to it in several ways. Using the WYSIWYG editor's chain link icon with a plus sign will allow you to search for your document.
Options for linking
- Media - Document
This is searchable in the WYSIWYG, using the chain link icon with the plus sign. This will link to a page that will have the download link. If you ever "remove" the document and upload a new one in its place in media, this link will NOT change. - File
This is searchable in the WYSIWG, using the chain link icon with the plus sign. This will link directly to a file path. If this path is used to link to your document, if you update your document (using "remove" in media), this link will need to be changed wherever it was placed! - Direct download using node path
This is NOT searchable in the WYSIWG. You will need to find the path within "Media". If you link using this path, be sure to use the root relative path. If you update your document using "remove" in Media, this path will NOT change.
Here is a screenshot that shows the "Writing for the web" document displaying in two ways, one the Media - Document and one to the File. Note that the direct download using node path is not found when searching for "writing".
Here is a screenshot of the media file that was being searched for above (Media -> then selecting on the Writing for the Web media document). The link in blue will take you to the direct "File" path. Under URL alias, you will see the "Media - Document" path (in its root relative state).
To find the "Direct download using node path", you will need to first get to the URL alias (for the example, it would be websites.ucr.edu/document/writing-web-best-practices). Once you are on the media document page, hover over the link provided. This link downloads the document. This is the path you will want to use if you want to link directly to the file AND not have to change it if you "remove" and update the document in the Media Library.
When hovering over the link to download the file, depending on which browser you are using, it will show the link to use.


